Sunday, July 26, 2009

Metric Cream Cheese Carrot Cake

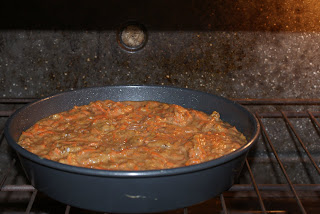
This recipe was a bit of a headache, mainly because it's in metric. It's a Marcus Wareing recipe. Wareing was formely Gordon Ramsay's Sous Chef at Aubergine and later they were partners in Gordon Ramsay Holdings. There is a youtube video of him making this cake and I've got the feeling his came out better than mine. One of the reasons is that like all world class chefs he cooks by weight instead of by volume. Unfortunately for all of my kitchen gadgets, a scale is not among them. Which meant I not only have to convert Metric to Imperial but mass to volume. This was such a pain I forgot to take pictures until just after the cake was in the oven. Below is my rough translation of Wareing's recipe. If ingredients are marked sold with metric weight on the package (carrots, nuts, cream cheese etc) I have not converted them. He also used a smaller diameter deeper pan, which makes the cook time longer for his recipe.


Ingredients

Cake
  • 3 medium eggs
  • 300g carrots, peeled and grated
  • 4 tbsp vegetable oil
  • 1/2 cup Turbinado sugar
  • 50g walnuts, chopped
  • 1 1/4 cup plain white flour
  • 1/4 cup whole wheat flour
  • 1tbsp ground cinnamon
  • 1/4 cup warm milk
  • 2 tsp baking soda
Cream Cheese Frosting Frosting
  • 200g full-fat soft cheese
  • 3/4 cup powdered sugar, sifted
  • 2 tablespoons unsalted butter softened
  • Finely grated zest of 1 lemon
  • 1tbsp lemon juice


Directions

  1. Heat the oven to 350. Grease a deep 7" round cake tin [or a 9" tin as I did, Ed.].
  2. Beat the eggs in a large bowl, then add the carrots, oil, sugar, and walnuts. Mix well. In a separate bowl, combine the flours with the cinnamon.
  3. Gently stir the two mixtures together until half combined.
  4. Heat the milk in a pan until warm, then remove from the heat and stir in the bicarbonate of soda. Add this liquid to the cake mixture and stir together until just combined. Do not overmix.
  5. Pour the mixture into the cake tin and bake for 30--35 minutes (20--25 minutes if using 9" pan).
  6. Test if the cake is cooked by piercing the center with a skewer: it should come out clean. If not, return to the oven and bake for a further 5 minutes, then test again. Leave to cool in the tin.
  7. Place all the ingredients for the frosting in a stand mixer and blend until smooth (or beat with an electric mixer or wooden spoon).
  8. Cover the cake all over with the frosting. Refrigerate until set before slicing.

Sunday, July 19, 2009

EPIC FAIL: Thin Mint Wannabes

I love thin mints so when I saw this recipe I stored it away and waited for the right time to make it. However, that right time is not this evening. In fact, the right time is never. This recipe calls for skills that I don't have on a good day, let alone after a non-stop weekend. It turned out so bad that I'm not going to post the recipe. First, the cookies turned out alright but the directions are nebulous as to the thickness they should be and how long they should be cooked. Next, the chocolate coating is impossible to get perfect. I ruined nearly a pound of chocolate by heating too fast. Let this rant be a lesson, if you are attempting to melt chocolate in the microwave, use half power and stir every 30 seconds. Alternatively, as I did on my second go round, save yourself the trouble and use a double boiler, you won't save much time and you won't risk screwing it up.


With that said, I'm posting the pictures sans recipe. If the reactions are good, I may reconsider and post the recipe. Even though my kitchen is coated in a protective layer of mint chocolate and I'm sure the ants will soon be marching like Sherman on Atlanta. In closing this recipe was a huge pain in the ass, not worth the time and that is why I'm not disseminating it. Even the pictures came out bad!

Ingredients
  • Too Many

Directions
  1. Don't waste your time

Monday, July 13, 2009

Monday Musing: I Found a Toaster Oven!

Actually, a toaster oven found me. A friend of mine is moving and he decided that he is no longer impressed with his toaster oven's appearance and like any true American he decided to upgrade to a better looking model. See generally, Jon Gosselin. So I gladly took it off his hands, gave it a good scrub and am awaiting something to toast.

In vanilla extract news, after a few days the liquid is slowly turning brown. I've read that the process takes about six weeks and beyond that the extract just gets stronger. I was going to post pictures but frankly, I can't be bothered.

Yesterdays recipe had good flavor but was a bit dry. I think the addition of more liquid (milk) would moisten up the recipe. However they do have a nice cakey consistency. However there was grumbling about being dry. I might have to compare them later in the year with my pumpkin spice muffins, which are a perennial favorite and will be posted just as soon as the weather turns cool (in other words, don't hold your breath).

Sunday, July 12, 2009

Gingerbread Muffins

It may seem a little odd to make a Christmas favorite in the middle of July but there is a well intentioned reason. One of my co-worker's family members is undergoing chemotherapy and a recent study suggests that ginger reduces nausea post-treatment. So I'm making a batch of these which will hopefully help her out. Please keep her in your thoughts and prayers until she makes it through this challenge.


Ingredients

  • 1/2 cup butter or hard margarine, softened
  • 1/2 cup granulated sugar
  • 2 large eggs
  • 2/3 cup mild molasses
  • 1/4 cup milk
  • 2 1/2 cups all-purpose flour
  • 1 teaspoon baking soda
  • 1 teaspoon baking powder
  • 1 1/2 teaspoons ground ginger
  • 1 teaspoon ground cinnamon
  • 1/2 teaspoon salt
  • 1/4 teaspoon ground cloves


Directions
  1. Cream butter and sugar together in large bowl. Beat in eggs, 1 at a time, beating well after each addition.
  2. Add molasses and milk and beat until mixed.
  3. Combine remaining dry ingredients in medium bowl.
  4. Add to butter mixture and stir until just moistened.
  5. Fill greased muffin cups and bake in 375°F oven for about 18 minutes until wooden pick inserted in centre of muffin comes out clean.
  6. Let stand in pan for 5 minutes before turning out onto wire rack to cool.

Monday, July 6, 2009

Monday Musing: Vanilla Extract

The trifle turned out lovely. The substitution of vanilla beans for vanilla extract didn't have a major effect. Everyone in the office enjoyed it and because it's so large there is some for tomorrow's mid afternoon sugar fix.

I confess, I don't use expensive vanilla extract. I have in the past but I can't justify it for baking as it usually only adds a small amount of flavor. However, I ran out of vanilla recently and am interested in making my own. It seems to be a very simple process along the lines of adding vanilla beans to clear liquor and wait. I bought vanilla beans on ebay a few years ago and while they're still good, I think I'm going to clear them out by making this extract. I'm going to purchase a cheap bottle of vodka and add a few extra vanilla beans to it. I think vodka will be the best choice because it won't impart any flavor of its own. But this got me thinking, adding vanilla beans to whiskey or bourbon may not be too bad, assuming you removed the beans before it turned into a smokey vanilla extract. What other liquors would make a good vanilla extract, your thoughts?

UPDATE: I purchased a small bottle of vodka and as of July 10 I added 4 vanilla beans to the 375ML of vodka, pictured below. As the vanilla permeates the booze, I hope to post pictures. As you can see it's clear now.

Sunday, July 5, 2009

Patriotic Strawberry and Blueberry Trifle

This recipe is one I've made quite a few times before and I can't imagine an Independence Day without it. With that said, it's one of the few recipes that uses pre-made ingredients. In fact, I didn't bake anything for it, I use a pre-made Angel Food Cake (almost always from Publix). This is partly because I'm lazy and partly because Publix makes a better Angel Food cake than I've ever made.

To make this recipe you'll need an Angel Food cake, blueberries and strawberries, as well as the custard recipe below. Assemble the trifle by layering cake, berries, custard, cake, berries, and custard until you run out. Also, I used vanilla beans to flavor the custard because I ran out of vanilla extract (more on that tomorrow) and only had vanilla beans.


Custard Ingredients
  • 4 tablespoons sugar
  • 2 tablespoons corn starch
  • 2 large egg yolks
  • 2 cups milk
  • 1 tsp vanilla extract (or seed scrapings from a vanilla bean)


Directions
  1. Combine sugar and corn starch in saucepan (no heat).
  2. Whisk in egg yolks.
  3. Gradually whisk in 2 cups milk.
  4. Cook over medium/low heat until boiling/thick, stirring constantly.
  5. Remove from head and add vanilla.
  6. Transfer to pyrex bowl, cover with plastic wrap (to prevent pudding skin from forming) and refrigerate.

Wednesday, July 1, 2009

Wednesday Musing: A Turn for the Healthy!

As in most aspects of my life I'm in the weeds in getting this posted. This week's recipe went over very well. The key is to almost underbaking it. I pulled it out when the edges were just beginning to get brown which resulted in a very moist and chewy finished product. If I were going to remake it I would cut the chocolate to 9oz and perhaps add a caramel swirl. Overall, it was just the thing to get me through an abbreviated week.

A close friend of mine made a healthy version of this recipe with the following ingredients:
  • a little less than 1 cup whole wheat flour
  • 3/4 tsp soda
  • 1/4 tsp salt
  • 2 cup oatmeal (and by this I mean oats, plain old regular oats)
  • 3/4 cup applesauce
  • 1/2 cup splenda
  • 1/2 cup brown splenda (which I didn't even know they made)
  • 1 serving egg beaters
  • 1 tsp vanilla
  • 6 ounces semi sweet chocolate chips
  • 1 cup chopped walnuts
She also made the regular version and I will post her thoughts thereon soon.